


Enjoy making this holiday cheesecake in your instant pot this year. You will be surprised how creamy and delicious this instant pot cheesecake is. Gingersnap cookies(used in this cake base), vanilla and sweet berry pie topping make this cheesecake so holiday-like and perfect for the season.
The idea of making a cheesecake in an instant pot always scared me. I love cooking in the instant pot and even tried some Indian desserts in it too. But cheesecake baking was always failed in my kitchen. I either overbeat the batter or overcook it in the oven. Sometimes my cheesecake becomes dense and a lot of times, it is not the way I expected. But this time, I finally found a recipe that worked so well. Or, it can be just the instant pot cooking that made the difference. It’s creamy, rich and super delicious.
Holiday Cheesecake - Instant Pot or Bake
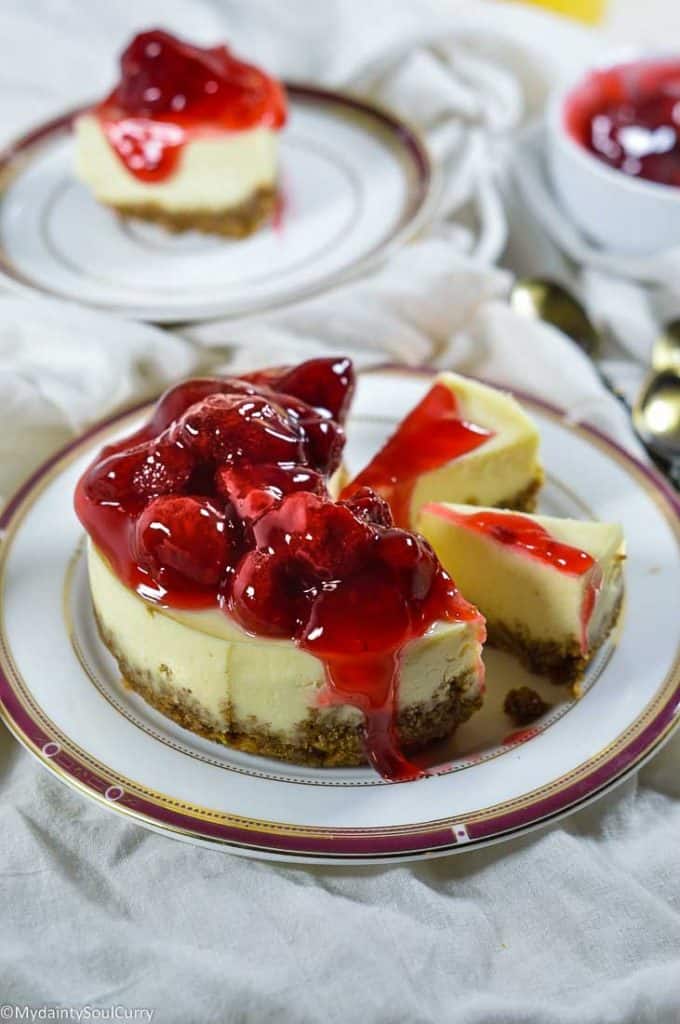
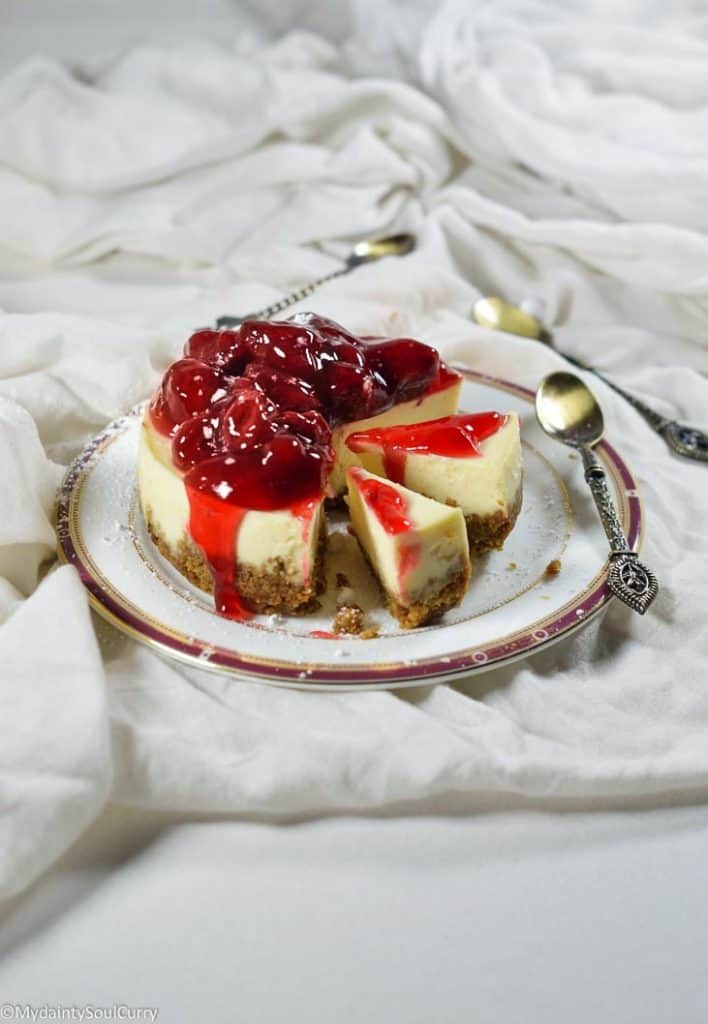
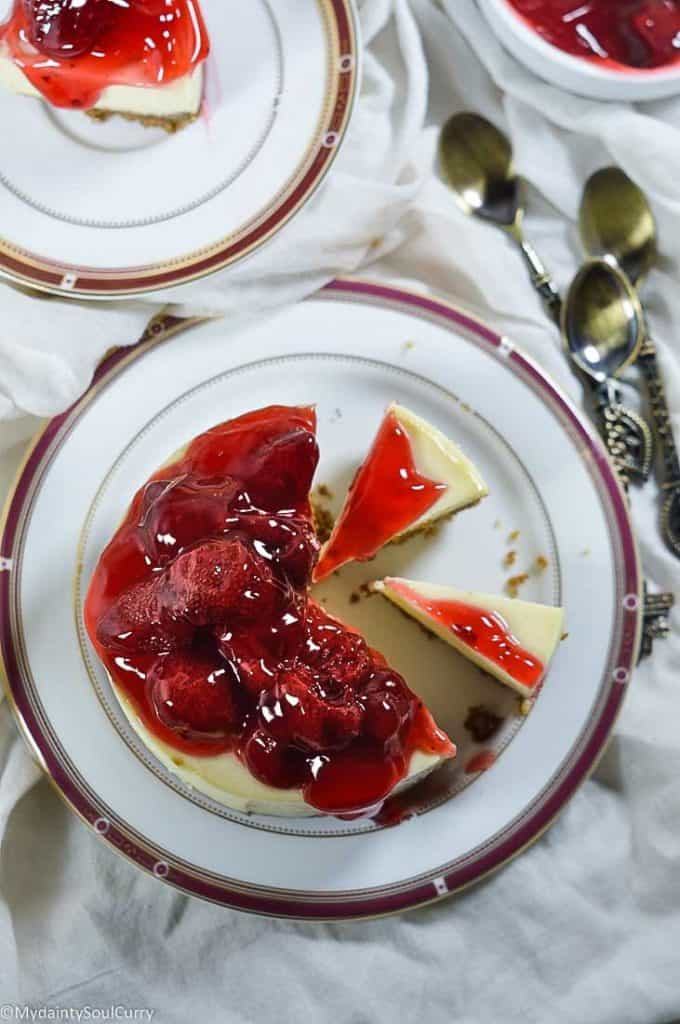
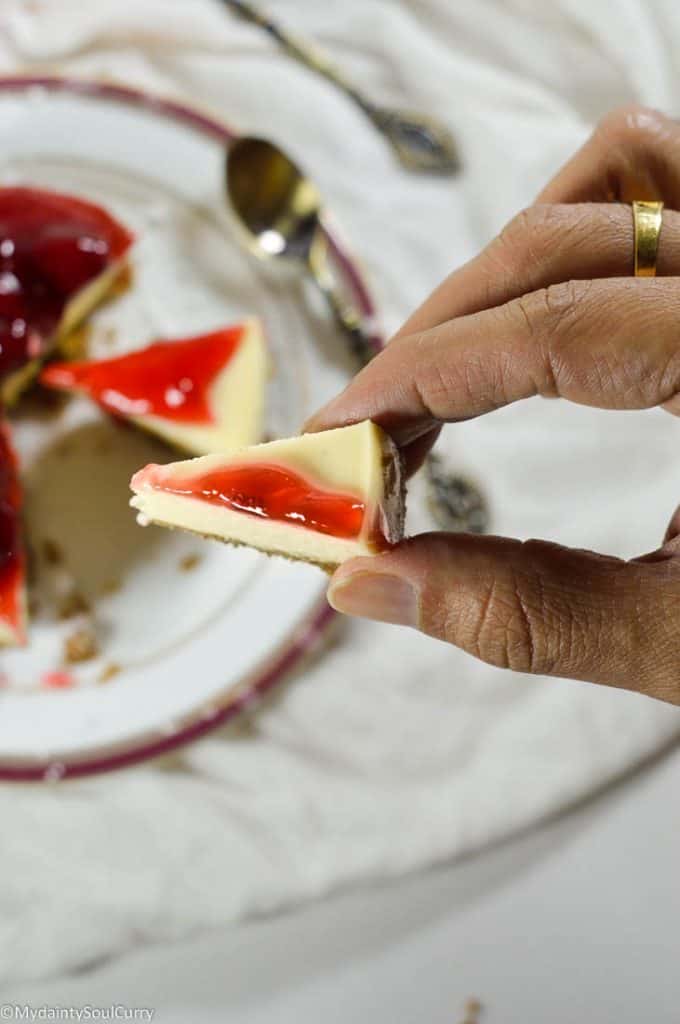
For a holiday-inspired look, I chose the vanilla cheesecake base and a rich, red strawberry pie filling topping. It’s easy, because we find the pie filling readily available in the store. Plus, it tastes delicious.
I tweaked my vanilla cheesecake recipe a bit for this recipe. While the batter remains the same, I used ginger snap cookies as the crust for this recipe. You can spice up the batter a bit with ground nutmeg or top the cheesecake with sautéed apple and cinnamon for an apple-pie cheesecake. In short, you can always customize the topping as per your convenience and preference and create a unique-flavored cheesecake for your holiday festive spread.
How To Make Holiday Cheesecake In Instant Pot?
Here is how you can make this yummy holiday cheesecake in your 6 or 8 quart instant pot.
Ingredients:
Cheesecake Batter: The recipe uses the following ingredients. 8 oz cream cheese (softened at room temperature), ½ cup condensed milk (sweetened variety), 1 large cage-free egg, 1 tablespoon vanilla bean paste or 1 tablespoon vanilla extract
Cheesecake crust – ginger-snap cookies or graham crackers ½ cup+1 tablespoon gingerbread spice mix, 1 tablespoon organic granulated sugar, 1 ½ tablespoon salted butter
Topping – Canned strawberry pie filling or fresh berry compote
1 7-inch springform pan or two 4-inch springform fans
Method:
Prepare the pan:
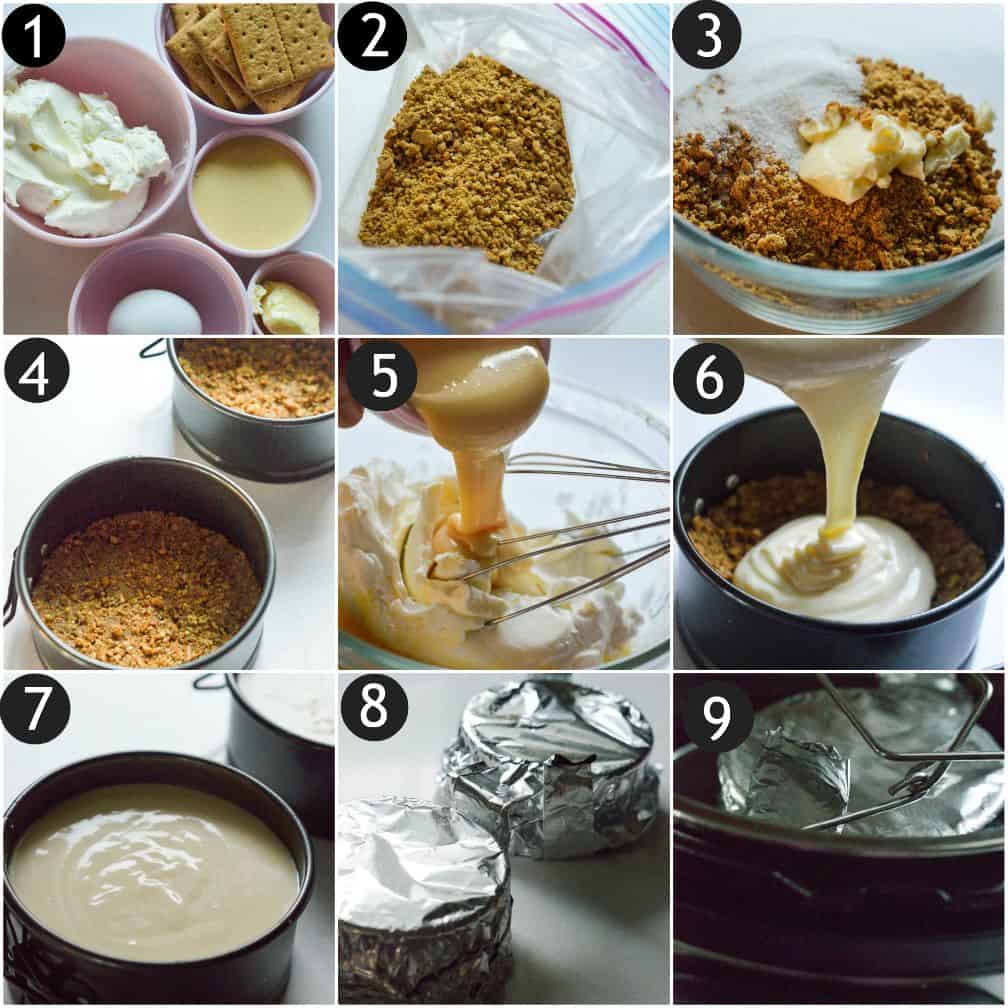
Before starting to make the cheesecake batter, make sure that all the ingredients are in room temperature. The egg, cream cheese and butter has to be in the room temperature. If you forget to keep these ingredients out to bring them to a room temperature, then dip the eggs in hot water for about 3-4 minutes and microwave the cream cheese for 30 to 60 seconds until it is softened.
Start by preparing the springform pan for the cheesecake. Cut the parchment paper to fit the springform pans and line the bottom of each pan with the parchment paper. Also, spray the inner walls of the pan with any cooking oil spray. This will help us to avoid the crust sticking to the bottom of the pan.
Make the Crust:
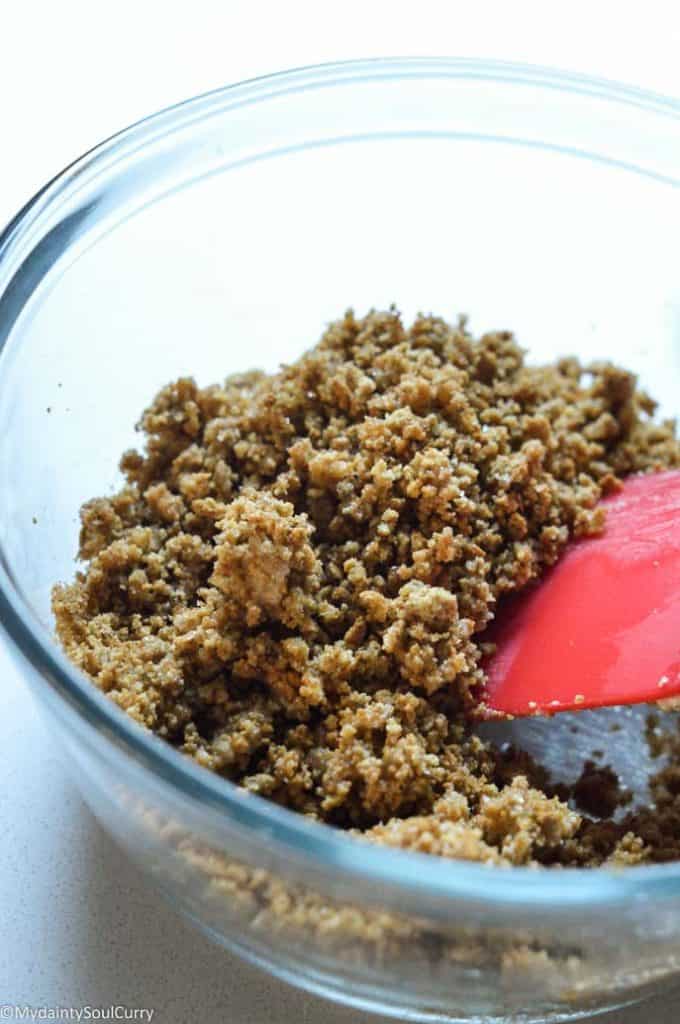
In a food processor, take the cookies and process till they are crumbs. Now add granulated sugar, spice mix, melted unsalted butter and salt and process till the mixture looks crumbly. Now pour the mixture into your springform pans. Use your fingers or a spoon to press the mixture firmly onto the bottom and then smooth out the surface. Try to create an even layered crust while pressing the mixture onto the cheesecake pan bottom.
Prepare the batter:
Make the cheesecake batter – in a large bowl, add cream cheese, egg and condensed milk. Add vanilla paste or extract and mix well using a spatula or a whisker. Do not overmix the batter. All you need to do is to make an even and smooth batter. Make sure to stir well until the egg incorporates well in the cheesecake batter.
Smooth top tricks:
Slowly pour the batter into your cheesecake pans. Now, tap each cheesecake pan for 5-10 times lightly on the counter to pop the air bubbles. The less the air bubbles, the better our cheesecake will be. Therefore, make sure not to skip this step.
Seal the pans:
It is essential to cover each spring form pans before placing them inside the instant pot for pressure cooking. I often use aluminum foils to cover the springform pans and then use folded strips of aluminum foils on the bottom that wraps up towards the top. This will help us to easily remove the cheesecake pans post pressure cooking.
Pressure Cook:
- Add a cup of water to the inner pot of your instant pot and place the trivet. Carefully place each springform pans with cheesecake mixture and space out if you are using more than one.
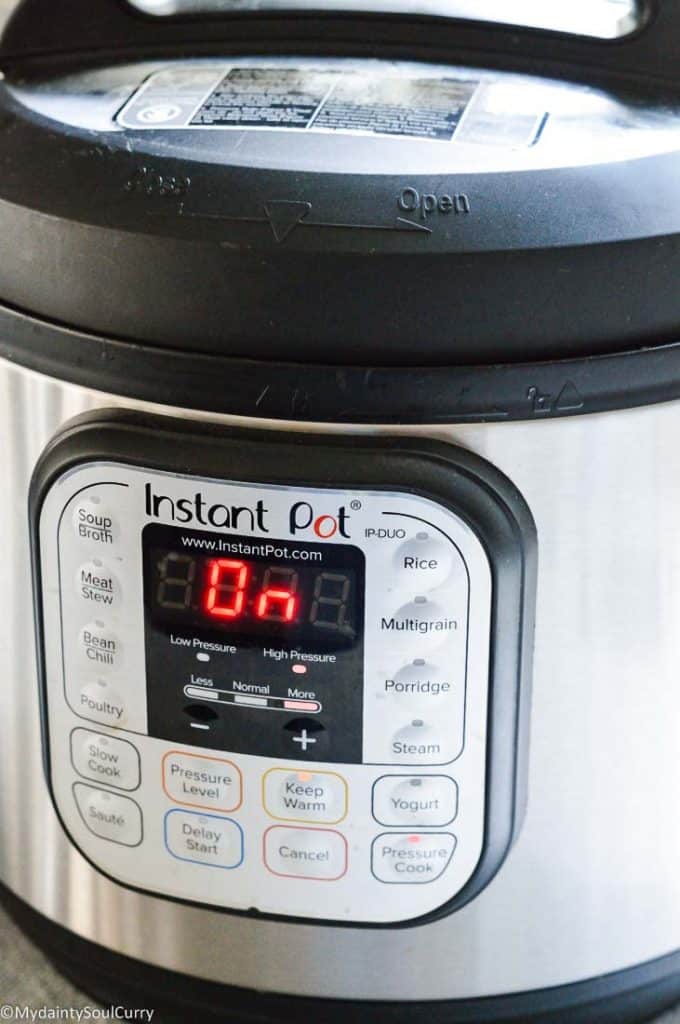
- Close the instant pot and seal the vent. Now set the instant pot to manual pressure-cooking mode (high-pressure) and add 40 minutes of cooking time. After the cooking time, wait for natural pressure release till 15-minutes and then quick release pressure till the pressure knob drops.
- Open the instant pot and carefully remove each pan from the instant pot. You may need to use a towel or kitchen mittens at this point. Unwrap the cheesecake pans and wait for the cake to cool down completely. It’s okay if you see a soft center at this point.
- This will all harden up as it cools in the refrigerator. After cooling it on the counter for about an hour, refrigerate the cheesecake for about 2 to 4 hours in the refrigerator.
- Once cooled, take the cheesecake out of the springform pan and top it with your favorite topping.
- I have used the canned, strawberry pie filling as a topping here. It looks very festive and tastes great on our vanilla-based cheesecake. This is a classic New York style instant pot cheesecake.
- Other options for this holiday cheesecake are: sautéed apple and pecans, poached pears, quick berry compote and caramelized nuts.

📖 Recipe

Holiday Cheesecake
Equipment
- Instant pot
- one 7-inch springform pan or two 4-inch springform pans
Ingredients
Cheesecake Batter
- 8 oz cream cheese (softened at room temperature)
- ½ Cup condensed milk(sweetened variety)
- 1 large cage-free egg
- 1 tablespoon vanilla bean paste or 1 tablespoon vanilla extract
Crust
- ½ Cup Ginger snap cookies
- 1 tablespoon organic granulated sugar
- 1 ½ tablespoon unsalted butter
- A pinch of sea salt
Toppings
- ½ Cup Strawberry pie filling or berry pie filling
Instructions
Prepare the pan
- Start by preparing the springform pan for the cheesecake. Cut the parchment paper to fit the springform pans and line the bottom of each pan with the parchment paper. Also, spray the inner walls of the pan with any cooking oil spray. This will help us to avoid the crust sticking to the bottom of the pan.
- Also, spray the inner walls of the pan with any cooking oil spray. This will help us to avoid the crust sticking to the bottom of the pan.
Make the Crust:
- In a food processor, take the cookies and process till they are crumbs. Now add granulated sugar, melted unsalted butter, and salt and process till the mixture looks crumbly.
- Now pour the mixture into your springform pans. Use your fingers or a spoon to press the mixture firmly onto the bottom and then smooth out the surface. It is better to create an even layered crust.
Prepare the batter
- Make the cheesecake batter – in a large bowl, add cream cheese, egg, and condensed milk. Add vanilla paste and mix well using the lowest setting of the hand mixer. Do not overmix the batter.
- If you are unsure how to use the stand or hand mixer, use a silicone spatula to mix the ingredients and make an even and smooth batter. Make sure to stir well until each ingredient is incorporated well.
Smooth top tricks:
- Now pour the batter into your cheesecake pans. Tap each cheesecake pan for 5-10 times lightly on the counter.
- This will even out the batter and pop the air bubbles too. The less the air bubbles, the better our cheesecake will be. Therefore, make sure not to skip this step.
Seal the pans
- Because steam builds up and water condensation is natural in instant pot cooking, it is essential to cover each springform pans before placing them inside the instant pot for pressure cooking.
- I love to use aluminum foils to cover the springform pans and then use folded strips of aluminum foils on the bottom that wraps up towards the top. This will help to easily remove the cheesecake pans post-cooking.
Pressure Cook
- Add 1 cup of water to the inner pot of your instant pot and place the trivet. Carefully place each springform pans with cheesecake mixture and space out if you are using more than one.
- Close the instant pot and seal the vent. Now set the instant pot to manual pressure cooking mode (high-pressure) and add 40 minutes of cooking time.
- After the cooking time, wait for natural pressure release till 15-minutes and then quick release pressure till the pressure knob drops.
- Open the instant pot and carefully remove each pan from the instant pot. You may need to use a towel or kitchen mittens at this point. Unwrap the cheesecake pans and wait for the cake to cool down completely.
- It’s okay if you see a soft center at this point. This will all harden up as it cools in the refrigerator. After cooling it on the counter for about an hour, refrigerate the cheesecake for about 2 to 4 hours in the refrigerator.
- Once cooled, take the cheesecake out of the springform pan and top it with your favorite topping – caramel, cream, fresh fruits or canned fruits and enjoy.
Garnish
- For a red top, add strawberries, strawberries in sauce or any berries in red color.
Notes
- Do not overmix the batter. Too much air will result in a dry and cracked-top cheesecake.
- Customize the cheesecake with toppings of choice. Cherry, strawberry pie fillings and fresh fruits work really well.
- I have used the canned, strawberry pie filling as a topping here. It looks very festive and tastes great on our vanilla-based cheesecake. This is a classic New York style instant pot cheesecake.
- Other options for this holiday cheesecake are: sautéed apple and pecans, poached pears, quick berry compote and caramelized nuts.
Nutrition
Here is my Instant pot vanilla cheese cake and vegan cheesecake recipes
kim
Love this recipe! It's so easy and delicious. I'll definitely be making this again and again!
Pam Greer
My daughter has been telling me how amazing cheesecake is in the Instant Pot! You're easy and complete instructions make it so doable!
Jen
The gingersnap cookie base is such a great idea! It adds the perfect balance of flavors to this cheesecake. Loved it!
Emily
Oh wow this looks so impressive, can't wait to try it!
Jacqueline Meldrum
Now that is something I would never imagine could be made in an instant pot and it looks lush. In awe here!